Rental Property Work

We have several rental properties in Richmond, VA. However, we moved away from the area in September 2020, leaving the properties under a property manager’s oversight. My goal was to make it back to the houses annually to do walk throughs of properties. It’s surprising how many people don’t tell landlords about issues timely. Since most of our properties keep long term tenants in them, we don’t get eyes on the condition of the house regularly like we would if we were turning over the house between tenants.

Generally, I check to make sure their HVAC filters are changed out, that they don’t have any piles of garbage or old food (or the gigantic pile of laundry that was blocking one tenant’s second form of egress), that the yard is maintained, and simple things like that. I also take this as an opportunity to fix or improve things that I know need attention, but weren’t necessarily worth the up-charges of hiring the action out to a contractor.

We did a walk through of the Richmond houses in July 2022. At that time, nearly all our properties had long term tenants in them. A few small items came out of those walk throughs (e.g., change out filter, re-caulk the tub). While we hoped to get there last summer, it just wasn’t in the cards with our 3rd baby.

Based on the rest of our summer schedule (and soon to be constriction of school schedules), we were only able to get there for 2 full days. None of the work that I wanted to get done is a high priority; it’s mostly work that would improve the aesthetic of the house or help the longevity of an investment (like a new porch).

PROPERTY 7

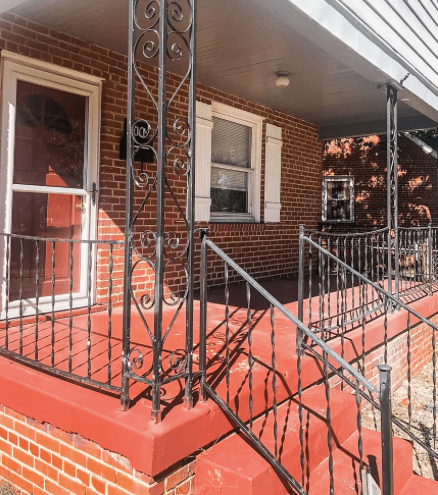
This house recently turned over. The house was flipped when we purchased it 7 years ago, and we knew that everything that was done before we owned it would just be a bandaid. We had a couple of long term tenants in the house, and we even had quick turnovers because people needed a place to live, so we didn’t have time to do major renovations. It was time. We put a lot of effort into fixing up the place (e.g., all new paint, new flooring and fixing of subflooring). The front porch and front door were red, and it just made the house look dingy. I wanted to make it look better. See: not a priority, but something worth looking into eventually.

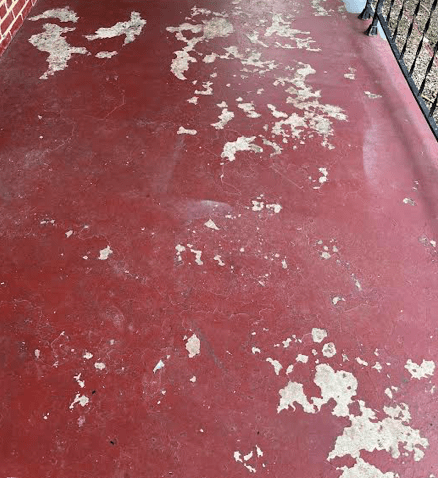
I arrived on the evening of the 4th to pressure wash the porch so it would dry by morning when I would paint it. I did not account for how bad the condition of the paint was. It appears someone just painted over peeling paint years ago. There were several layers of gray, purple, and red colored paint. The latest paint job had several places where that was the only layer of paint on the concrete. Very odd, but that meant that I had to scrape as much flaking paint away as I could. I spent over 10 hours on this. Not exactly what I had in mind. I scraped and scraped and scraped. I then put two coats on. I’m nervous how long it will hold up though. I did this during an extreme heat advisory so it likely didn’t cure correctly by drying in mere minutes.

I also did 3 coats of black over the red door. I don’t think it’s going to hold up against her animals, but at least it looks better from the street.

This house still needs the back deck pressure washed and painted. However, this is something I’ll do either with tenant turnover or if we sell it. It’s really worn down and places are missing paint because we removed the covered portion of it. The porch railing had also been painted at some point and is peeling, but I hadn’t budgeted time for that. I did a few touch up areas with black paint to cover where previous owners had painted it red.

PROPERTY 3

The tenant here reached out to me a couple of months ago to tell me that a salesman broke their doorbell. Fascinating. They claimed “well, it’s old.” My thought was “well, it’s meant to be outside, and the house next door was built the same time without any doorbell breakage now.” But instead of sending someone out to fix that, I put it on our to do list. It took Mr. ODA about 2 minutes worth of work, and the new doorbell cost $10.

While there, we cleaned out the gutters. That’s been a known issue throughout the life of this house because there are a lot of trees around the perimeter. We also cleaned the mildew growing on the house.

PROPERTY 2

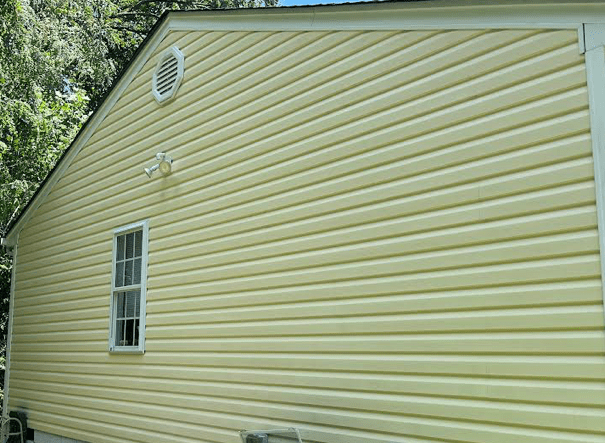
This house is a mirror image of Property 3, but the trees in the backyard are much closer to the house. The back of this house had significant mold growth on the siding. We got all the siding cleaned up there too. Mr. ODA got on the roof to clean out the gutters. While up there, he also cut some trees off the roof.

The first picture is a ‘during’ picture because I didn’t get a ‘before.’ The part at the top that is dark is actually better than what was there, and it was over the entire back of the house. We soft washed with a mold and mildew cleaner and got it looking almost brand new.

PROPERTY 9

During the last turnover period of this house, we had the front porch jacked up (it was sinking), had the front stairs redone (they were sinking too), and had the back decking replaced. I had intended to stain the new wood for this house, but it being well over 90 degrees precluded that action. Instead, Mr. ODA got the siding on this house all cleaned up, and he cut/pulled several large weeds that were growing.

DRIVE BYS

We did drive by the other Richmond properties that we have. I didn’t have the time (or energy) to schedule walk throughs of everything. Once you do a walkthrough, you inevitably end up with a list of things to do to the house. I already had a lengthy list of things to do, so I didn’t want to manage that right now. Just by driving by, I did add to my to do list that one house needs its gutter replaced (how does a gutter, with no trees around, twist away from the house), and that their back deck really needs to be replaced (just the deck boards and railing; the substructure is fine).


I’ll need to make it back there to walk through the properties. If nothing else, it gets the tenants to clean things up once a year. One of our property managers offered a filter check quarterly, which was really used as a way to get into a house and make sure things were being kept clean and orderly. While a filter should be changed that often, I think that’s too much time being in someone’s place they call home. However, once per year is worth it to keep things moving in the right direction and to make sure there aren’t any maintenance issues that hadn’t been reported.

Slider to French Door Replacement

In my January financial update, I mentioned that we “somewhat on a whim” replaced our back door. I started to tell the story there, but I had more to share about the process and how we went about it.

We purchased our home in June 2022 with a sliding door out to the deck. This is the first house we’ve had with a slider. It’s not my preference, but it wasn’t worth putting any energy into.

Over the last year and a half, we’ve had trouble with it. The lock mechanism kept freezing on us, making it difficult to unlock the door to let the dog in and out. The door was also very heavy and/or hard to open. Our slider in the basement is much easier to move, but this one just wouldn’t budge without a lot of effort. On top of all that, there were vertical blinds over the door. I had no problem with how they looked. However, they weren’t installed correctly to begin with (the story of everything in this house, apparently), and the stick used to open and close them were on the wrong side. Then add in a one-year-old pulling on the blinds. Slats kept breaking, I was being blinding by the sun, and I was tired of fighting the baby to stop pulling at them.

In our Virginia home, we had a french door style (although one side was stationary) back door. Then in our last home, we had a regular back door, but there were blinds between the windows. That was my dream at this point: blinds between the glass so that they weren’t pulled or broken by kids, and a door instead of slider. I really didn’t want to hang curtains over the doors or manage blinds that get attached to the side of the door.

FINANCIALLY

We had a window company come out for a quote. He said that some work may need to be done to adjust the opening because it’s not a standard opening, but didn’t say much else. He went through all the details and finished out our meeting with a quote of $9,300. I can’t even begin to explain how that wasn’t even close to reasonable. He said it wasn’t a custom door and claimed that adding the blinds to the door was $2,100. No thanks.

The door I wanted was at Home Depot for $995. Seriously. It hit all the specs I wanted. The door was primed, not painted. To order the door painted white, it was going to be $2,200. I could paint the door myself for a lot less than $1,200. Both sides actually open, even though I was going to be happy with just one side opening.

I was hesitant to buy it because the window company made me feel like I had a custom opening. A few days later, my dad came to visit, so I asked him to measure the door. He confirmed that it is a standard size door. He said that before even measuring it, he knew it was going to be a standard opening because it would be way too much money to create a custom slider. He said I should get the door, and he’d help install it. I really only wanted the door measured. I planned on having our deck contractor install it, which he said he’d do for $500.

As I looked more into it, I was able to get the door scheduled for delivery for the next day for $79. By amazing luck, it was delivered at 9:30 am, meaning we could get to work right away.

INSTALLATION

The installation process was a lot more straight forward than I expected. It’s a job that requires heavy lifting and extra hands to hold things in place every now and then, but each step is logical.

My dad removed the interior moulding, and then he cut through any screws that were between the door frame and the house. We tipped the slider outward and moved it out of the way. We then cleaned out the opening, removing any extra foam insulation and sweeping out the sill. The next step was to put 3 caulk lines on the sill. The hardest part was keeping the kids and dog from stepping on this before the new door got moved into place. The door was then lined up on the bottom and tilted into place. A couple of screws were put in to hold it while we shimmed it.

The shimming process was time consuming, but it was straight forward. The screws went straight through the holes already in place for the hinges (one screw in each hinge was longer than the others so that it would hold the door in place). Once the screws were all in place, we then put spray foam around the door. It was important to keep an eye on the spray foam so that it wouldn’t creep out and attach (and stain) to the door.

The door that was removed didn’t have the brick mould on the exterior, so it sat further into the house. The door we installed did come with the brick mould, and my dad said it was best to keep it on. This meant that our gap between the floor and door frame was bigger than we’d prefer. My dad actually removed the last row of hardwood flooring (that had been ripped down to fit the original door) and installed a new, full row of flooring (we had some on hand in the basement). That was pretty impressive to me!

FINISHING TOUCHES

We could have used the moulding around the door that was already there, but I wanted to change the look of it. While I decided on the new look, it gave the spray foam almost 24 hours to expand and dry out before we cut it back. We cut it back and installed the moulding as I designed it. I painted the moulding, while deciding on the door color.

Everything around my house is a navy, even though I’m trying to push towards a black-and-white. The kitchen backsplash was navy when we bought it, the back of the living room bookshelves are navy, the dining room walls are navy, and all the roman shades are navy. I was afraid to pick a different color, so I went with navy on the doors. I used a metal-friendly paint to hopefully prevent chipping.

The door has moulding around the glass, with screws on the interior. The hardware bag should have included plugs for the screw holes, but it didn’t. I emailed the company asking for replacements, which they sent within 2 weeks.

COST BREAK DOWN

Door: $1,142
Paint: $22
Moulding: $71
Caulk: $14

Total tangible costs are ~$1,250. We then also bought my dad gifts to pay him for his services, knowing he wouldn’t take straight cash from us.


For now, I’m keeping the door navy. This picture only has 2 coats of the navy; I need to do the final coat with a roller. I think I’d prefer a lighter color on the door to compliment the navy, but also so you could see the black handle and black hinges I installed. I need more time to contemplate the change. Maybe once our deck is replaced (ignore the mangled deck railing and furniture that still hasn’t been replaced/fixed from the July 2nd storm where a tree fell on it) and the weather is nicer, I’ll have an epiphany moment. For now, I’m beyond thrilled with the replacement that was under $2000 for all of it.

DIY Projects

I took a break from writing posts to play in the nice weather we were having and then finish up some outstanding projects this weekend. Some projects are still not finished, but I felt good about the progress. Here are some things I did, which means you can do it too and save yourself some money. ๐Ÿ™‚

SHOE STORAGE: $6

We have a mud room “welcome center” or “drop zone” in our house. Here’s a picture from the builder on what it looks like.

It’s beautiful until you realize that the purpose of these shelves is to house things like shoes, keys, outdoor things, etc. There’s no point to style them like bookshelves, and it’s hard to keep it looking organized. When we have guests, they have to see this because it’s outside the only first floor bathroom. It drives me crazy that people see it. I store all our craft supplies on the top shelves (little hands), and I ripped all that down and organized it into bins. It’s not pretty to look at, but it’s still better than the pile of things that quickly gets unorganized. The bottom shelves have shoes on them. A year ago, I asked Mr. ODA to build me an intermediate shelf in the bottom right cubby. We used scrap wood already on hand at that time. Shoes aren’t tall, and we were just throwing them in there on top of each other. Well, all this build up just to say: I finally bought contact paper and wrapped the plywood. I originally wasn’t going to bother painting it because I didn’t have the trim paint on hand. Since then, a nice worker left me a pint of it, but I still thought the contact paper would be better. It seems so small and silly, but I got the pattern to line up straight when I wrapped it on the edge, which makes me happy.

LAUNDRY ROOM: $49

Again, nearly a year ago, I took down the builder-grade wire shelf that was in the laundry room. I then patched the gigantic holes that this type of shelf requires. Here’s a builder photo of a laundry room in this floor plan to show what I mean, and where it started.

Instead of blinds in there, I frosted the bottom sash of the window with spray paint I had left over from doing a similar job in our last house ($0). Someone was getting rid of a cabinet on our neighborhood page, and I wanted it for the laundry room ($0). I bought cabinet enamel ($25), which I highly recommend over regular paint if you want a clean look. It’s pricey, but it’s worth it (I’ve used it here and on a desk I refinished, and I still have half the quart left. Here’s the one I used.

I hung this repainted cabinet last summer. Every time I walked by, I thought that a light brick wall would look so good with the color of the cabinet. I thought about it for several months and finally decided to go for it. I bought 2 rolls of peel and stick wallpaper off Amazon ($14). It did not go well. I got the idea out of my system, but I didn’t enjoy the process of hanging it. I’m curious about doing traditional wallpaper, which is easier to move around and line up, but I was disappointed that these two sheets didn’t automatically line up with each other and I had to piece them together.

In my last house, I hung a cabinet and then Mr. ODA and his brother built two shelves that I stained dark next to it. That’s still my goal here, but I haven’t done the shelves. I had already been in Home Depot for an hour, and Mr. ODA wasn’t there to talk me through the options, and HD likes to just throw all their crap in the lumber aisles to make it very difficult to navigate if you have a cart, so I gave up. But I did get chair rail ($10)! I originally wanted something really big, but I panicked and went with a smaller, more ornate option. I stained it espresso (already on hand from the last laundry room job), so you can’t really see the details in it, but at least the end of the wallpaper is covered now. It doesn’t matter how many times I am around an air compressor and nail gun; I do not enjoy that thing.

I also put the contact paper that I bought for the shoe shelf on the bottom shelf of the cabinet I refinished since paint had dripped into it and the original owner of it had drilled several holes through the bottom of it. P.S. The knobs were put on by the previous owner; one day I’ll patch the hole and realign the knobs so they’re even, ugh.

STENCILED WALL: $73

I don’t really recommend stenciling a whole wall. I’ll probably put 10 hours into the wall already by the time I’m done. Also, $73 is a lot to spend on one wall, but I’ll find more uses for the paint. That’s the upfront cost, but with leftover supplies, there will be more projects.

I wanted my daughter to have pink in her room, but nothing bright. I found this beautiful muted pink color. I wanted to do one wall this color in a satin finish, and then get the same color but in an eggshell or flat to do the stencil. While at the store, I found a different kind of paint and went for that instead; it’s a metallic paint! It’s subtle enough that it’s hard to capture all the stenciling in photographs, and it changes how you see it based on how the light hits it.

So I’ve purchased a gallon of pink paint (that has more than 2/3 left in it) ($38), this special paint (with about half of it left once I’m done) ($20), and the stencil that I had someone make for me ($15).

Halfway through the wall, I discovered an error I’d been making. I had been using a manual level to make sure the top of the stencil was level when I put it on the wall. The stencil was not cut correctly – the image on the stencil is cockeyed within the stencil, so leveling the edge of the stencil meant that everything I was painting wasn’t straight. Once I started using the laser level, I found that the level line wasn’t the same whether I used the top of the cut out part or the edge of the stencil piece. I tried to start correcting it because, while it wasn’t noticeable, I figured it’d get noticeable by the time I got to the other edge of the wall and along the ceiling. Things got messed up in a few spots where I couldn’t quite see where I was lining it up against what I had already painted.

Oh, and let’s not forget that I had the paint out, went to deal with a crisis with my son (potty training!), and my daughter seized the opportunity. She got my paint brush, dipped it in the paint, and smeared it all over the stenciled wall I had already done. Luckily, that stencil was dry, and I found her right away so the paint was wet, so it mostly just wiped off.

There are two sections I’ll need to re-paint pink and then re-stencil, and then there’s a few touch up areas where I’ll need to hit it with a small brush and fix the pink around the stencil. Once paint got caked on the stencil and created its own barrier to bleeding behind the stencil, the wall is coming out perfect. If this didn’t take absolutely forever, I’d want to go back and do the first 5 rows I did without the laser level and caked up stencil, but no thanks.. it isn’t THAT noticeable!

The [near] finished project is exactly how I pictured it, which never seems to happen for me, so I’m powering through. Here’s a close up of the wall since there are too many imperfections to share the whole thing at this point.

BASEMENT WET BAR: $53

Mr. ODA and I put up shiplap against the wet bar wall as a feature. We didn’t want to close in the room with upper cabinets (this section sits in the middle of the open basement and we didn’t want to distract from that), we didn’t want to tile the wall with a backsplash because the wall is FAR from even, and we didn’t want to leave it painted with nothing above it. Mr. ODA decided on shiplap, and he liked the charcoal color instead of the white or painting it. It really looks great, but it’s unfinished. We didn’t know how we wanted to do the final piece. So this weekend, I bought two molding types to check it out, and we still need to add that and paint/stain it. I also purchased the sink faucet finally, which should arrive tomorrow. We first thought we’d put shelves in the shiplap, but after you work so hard to make it level and shim it like crazy behind each piece, you don’t really want to immediately drill anything into the face of your pretty project. ๐Ÿ™‚ I didn’t include the cost of the shiplap in my calculation above because that was purchased before this weekend’s goals of finishing projects, but the molding was $10 and the faucet was $43.

Speaking of finishing, this reminded me that I have to buy the cabinet pulls. We had held off installing them because the flooring people were going to come back and fix some things. There’s a protective layer on the outside of the cabinets, and I didn’t want to pull it off until they were done banging around near them (their workmanship was quite poor, so I don’t trust them). Since I wasn’t going to install them, I didn’t make it a priority to order them, but I can now. There’s more to come on the basement, since we did most of it ourselves.

DIMMER SWITCH: $11

Our son’s sleep has been an issue since birth (PSA: Buy the Taking Cara Babies course for newborns and save yourself a lot of frustration in life by getting a baby to sleep longer with less fights). We finally got into a bed time groove, but it involves him sleeping with the light on. It drove me crazy that it was so bright in there, so I removed the bulb from the overhead light and told him it was broken so he’d use the lamp. When we visited my family, he slept in a room with a dimmer switch and let the light be on the lowest dim level. I finally got around to purchasing the dimmer switch and installing it! Cut off the electric to the room at the electrical box, unscrew the old one, cut the wires, strip them to the right length (it’s on the back of the switch), insert the wires in the right places, screw it into the wall, and turn the electric back on.

SUMMARY

And that’s where I’ve been for the last week! We ordered a desk for the office and a dining room table now that all the existing furniture is where it’s meant to be with the basement finished. That’s what caused my final push to get things done. Now we have our daughter’s birthday party coming in a few weeks, and I was hoping to have almost everything completely before people are in the house! Now go do some projects you’ve been putting off too. ๐Ÿ™‚